Sunday, July 20, 2014

New Baby Yarn! :D

This week I was overjoyed by Lion Brand's newest yarn announcement, Modern Baby!!! 

Why so excited about a new baby yarn? The following quote from their website explains why..."The palette consists of crayon-like primary shades, along with rich pastels and neutral tones." I knit and crochet more baby items for photography props and newborn photos than anything else, and with the current baby yarns that are available, I am limited to pastels. Inevitably, I end up having to use a worsted weight acrylic that isn't "baby soft." This is not a big deal, but when it comes to clothing that is meant to be worn, it is a huge selling point for parents. They want the baby to be comfortable, and who can blame them.


I am also a color person. I love color! While I can appreciate the purity of pastels, I also want vibrant and "modern" options in an acrylic. I am not sponsored by Lion Brand, nor have I tried this yarn. In fact, I have yet to find the yarn. Yesterday I have spoke to the local hobby store (closest I have to a local yarn store) and they will be ordering the yarn and calling me when it's in. Once it's in, I will post an unbiased review on this yarn.

It also promises to have "a similar feel to the merino, alpaca and cashmere blends but with an anti-itch non-allergenic, easy care fiber blend of premium acrylic and nylon." My only concern is the chainette construction, which I have had experience with, just never in baby clothing. It will be interesting, but I am up for the challenge!

This is a link to the page for the yarn:  http://www.lionbrand.com/yarns/modernbaby.html

Tuesday, June 3, 2014

Knitting is Magic!

I will never forget sitting down at a table in the cafeteria / break room at my work (I was a government contract employee). One of my friends joined me, then a younger man. I was talking to my friend and knitting on a cowl. I noticed the guy watching me knit. He was staring at the stitches in absolute fascination. After a few minutes, he declared, "It's like magic!" Of course, my friend and I laughed at his awestruck voice and wide eyes. Later, when I was back at my desk, I started really thinking about it. Knitting really is magic!

I had seen a picture somewhere of a group of troops, sitting in a circle knitting while they were serving in Iraq. There was only one woman in the group. All of them were relaxing by knitting things for their loved ones in their downtime. I looked up the picture for this blog post.

Knitting in Iraq, John Sorich
http://www.startribune.com/local/west/86723927.html

I have always read that knitting was therapeutic, and found that I felt calmer and could concentrate better while knitting. Turns out I am not alone. Iraqi vets who are returning home and suffering from PTSD (Post Traumatic Stress Disorder) are also finding it as a good way to deal with the anxiety, depression, and the stress of serving their country.

Knitting is similar to meditation. It allows you to rest your mind and focus. Instead of focusing on nothingness, you focus on the calming motions of repetitive stitches. Insert needle, wrap yarn around needle, pull needle and yarn back through, repeat. The steady motion and light clicking sound of the needles allow you to free your mind of the stresses that keep it busy and make you more tense.

Staff Sgt. John Sorich, Jerry Holt,
http://www.startribune.com/local/west/86723927.html
Staff Sgt. John Sorich was a knitter before he was deployed to Iraq, but took the hobby back up in Iraq as a way to relax. After ribbing from others, he encourage other servicemen and women to take up the hobby with him and explained that the craft was his way of maintaining sanity in a chaotic world. 

Recent research and studies support this, finding that knitting (and crocheting, among other crafts and hobbies) is healthy for you, mentally and physically. Some physical and occupational therapist are now using knitting to help their patients regain their fine motor skills after injury. There is also research indicating that since knitting requires thinking from both side of the brain, it can slow or prevent the onset of dementia, including Alzheimer's disease.

See, the young guy in the break room was right. Knitting really is magic!

Sunday, June 1, 2014

Inspiration Can Come From Anywhere!

I was browsing my Pinterest home page when I came across a post from Stitch 11. Stitch 11 posts color pallets from pictures via their website and they give a nice tutorial on how you can do it yourself at this link: How To Make Your Own Color Pallet. I decided to try it out for myself and after playing with the PicMonkey website and software, I came up with some interesting combos with my own photos.


The above photo was one I took in August of 2012 in The Great Smokey Mountain National Park, in Gatlinburg or Pigeon Forge, TN. I would never think about having these colors in the same project until I was able to view them together side-by-side on the color pallet. Now they are my inspiration for a new pattern!


The second picture was taken just a couple weeks ago at Laurel Lake in London, Kentucky. Such a beautiful, tranquil picture. I love the color pallet that came out of this one too.

Follow the tutorial and see what you can make!

I may just make a few crocheted motifs out of one of these and see how the finished product turns out.

Tuesday, May 20, 2014

Know Your Yarn!

A ball of yarn isn't just a ball of yarn. Yarn comes in different colors, textures, and fibers for specific applications. Do you know what  boucle yarn is? Or the difference between a self-striping and variegated yarn? If not, you are not alone. That is why I am doing this post. It is important that you understand the yarn you are using, so that when you create something from it, that it will last and you won't be discouraged from finishing a project in the future.

The Label 

The first thing you should look at when choosing a yarn is the label. Below is a scanned image of the current skein of yarn I am working with. It is Premier Yarns: Deborah Norville Collection: Serenity: Sock Weight. I apologize for the wrinkles in the label, I had the yarn jammed in my purse yesterday while at a doctor's office.


The first line under the name of the yarn tells you how many yards of the yarn are in each skein and the weight of each skein. This lets you know how much yarn you will need to complete the finished project.

The next section tells us what type of fiber the yarn is made of. In this case: 50% Superwash Merino, 25% Rayon from Bamboo, 25% Nylon. The Superwash of the Merino lets you know that this yarn is machine washable. Rayon is a natural fiber, but Nylon is a man made fiber. You may ask what all of this means for you. The bamboo and merino wool will make this yarn soft and the nylon will give it stretch, which is preferable in a sock yarn. You can also machine wash the finished product. As someone who dyes yarn, it means that the merino will accept color well, but the rayon, nylon may not. This is actually the same yarn as the green yarn from my previous post. As you can see, it accepted color well, but I performed a test swatch before dyeing three skeins so there were no surprises. Had it been 100% wool, I would have skipped that step.

Skip to the bottom of the label where the barcode and UPC are. The color number and name are listed at the top of the white box. The LOT number (which was cut off, I apologize) is at the bottom of the white box. You want your finished product to be the same color throughout. Without this information, you would not be able to do this. The LOT number is the most important. The LOT refers to a dye lot. Yarn is dyed in larger groups or lots at one time and then marked with this number. The LOT number here is 2112. If you had a project requiring 2 skeins of yarn, you would have to purchase the same LOT number in order for the colors to match perfectly.

As for the symbols on the label, the chart on the left is a nice reference chart from Stitch11.com. Using the chart, you can determine that the yarn is Super or Extra fine weight, that when you swatch it, you should have 32 stitch and 42 rows when knitted with a US 2 needle or 26 sc and 36 rows when crocheted with a size E crochet hook. If you swatch is larger, you will need to decrease needle / hook size or if it is smaller, you will need to increase needle hook size.

The care instructions on the sample label at the top are written out, but the laundering symbols are still included. Symbol translation: machine wash warm, no bleach, no iron, lay flat to dry.

Now that you know how to read the label, let's look at the yarn!

Texture!

There are many different textures. Here are the three basics of yarn you will knit or crochet with on a daily basis.

Boucle 


The word Boucle is French for buckle or loop. It is a wavy or loopy textured yarn. The yarn itself creates the textural interest in a piece rather than stitches. The stitches do not have good definition so cables and textural stitches go to waste if you are using a boucle. It is somewhat challenging for new knitters / crocheters because it is difficult to see where you are while you are using it. However, for plain, simple, patterns, this yarn can work great because it creates the texture for you. Above is Lion Brand Homespun yarn. This is the first boucle yarn that popped into my head.

Single-Ply or Hand Spun


This yarn isn't perfectly even throughout, giving it a home made quality. It is fiber spun into one strand. It has excellent stitch definition, but mistakes are very obvious. The above picture is Bernat: Vickie Howell: Sheep(ish) yarn.

4-Ply

4-Ply yarn is probably the most common texture. It is 4 strands of single-ply that are spun together to make an evenly textured yarn. This yarn is even, and helps to cover some mistakes. It is easy to work with for beginners, and is very smooth to the touch. The above yarn is Cascade 220.

Color!

Tonal

Tonal yarn is a single color with various shades. I compare it to really good hair highlights. There are highs and lows that create interest and look good in almost any pattern you can imagine. Shown is Knit Picks Stroll Tonal Sock Yarn

Variegated

Variegated yarns are short colorways (single color) of a yarn, that when knitted or crocheted, become stripes and blends of gorgeous hues. Pictured above is Malabrigo Rios. One of my favorite yarns.

Self-striping
Self-striping yarn is very similar to variegated, but it is dyed in long colorways so that it stripes as you knit or crochet with it. This prevents you from having to change colors, you just keep going. Above is Crystal Palace Mini Mochi yarn

Ombre

Ombre yarn shifts shades from one color to another. It does not have distinctive stripes of self-striping yarn, but fades from one shade to the next with subtlety. Pictured is Freia Fine Handpaints Ombre Sport yarn.

What to choose...

I hope this helps you to make your next yarn decision. With the above information, you will be able to select the correct yarn for the project. Just remember to have fun with it!

Tuesday, April 22, 2014

Finished Product


This is the finished product of the yarn I dyed yesterday. I took pictures in the sunlight so that you can see more of the subtle variations in the dye. This is why I used 3 colors and went to the effort of "highlighting" the yarn. As you can see, the color isn't flat and you can see the variations in the dye. This gives your yarn more of a luxury look that you would expect to see in a yarn that costs 3 times the price. :D You did it yourself, and no one else will have exactly the same thing as you because it is a custom yarn.


Monday, April 21, 2014

Easter = Yarn Dyeing Fun!

I admit it. I am a big kid at heart. I don't have kids of my own, so while everyone else is buying Easter egg dye to dye eggs. I am stockpiling for the year for yarn dyeing. Today I hit a couple sales to stock up. I found most of the egg dyeing kit at half off, so for $1.50 or less. :D Of course, I couldn't wait to start so, I wound 3 skeins of Premier Yarns Deborah Norville Collection's Serenity Sock Weight yarn into hanks for dyeing. If you don't know how to do this, look it up on YouTube or click here for more information: knitting.about.com

Here is a tutorial on how to dye yarn with egg dye (and Wilton paste icing dye) :)


Getting Started!

You will need:
Egg dye (and Wilton icing paste dye, but it isn't required)
A microwave safe container
Vinegar
Water
Hair dye bottles for each color you want to use (Sally Beauty Supply is awesome for these)
Paper towels
Plastic wrap
Microwave
Wooden spoon
Scissors or a knife (to open egg dye pouches)
Gloves (optional, I don't use in the tutorial at all)

Yarn in pre-soak
Step 1: Pre-soak

I use the same container for everything, so you will only need one. Fill your microwave safe container with warm water about 2/3 of the way and add about a cup of vinegar (not an exact amount, you just want the yarn to be coated in it to make the dye stick).

Set the container to the side so that you can prepare your dye. Let the yarn soak while you prep.

Fig 1 - PAAS 9 color egg dye kit
Step 2: Preparing the dye

For this step, you will need scissors, paper towels, water, the hair dye bottles, egg dye, and vinegar

The egg dye comes in little pouches inside the dye kit (see Fig 1) . Sometimes their are multiple pouches and you will notice that none of the colors are marked. Most of these annoying tablets also don't look like the actual color they are. There is an easy way to find out.

Place each little tablet in a line across a paper towel. Under each tablet, drop a couple drops of water on the paper towel. Press each tablet on the water drop below it and remove. This is the actual color the tablet will turn when mixed with water and vinegar (see Fig 2)!

Fig 2 - Small packet of PAAS 9 color egg dye kit
Notice that the left and right colors are pretty similar, but the one in the middle which looks brownish is actually a vivid lime green.

Once you have it figured out, then it is time to mix the tablet with vinegar so that it dissolves completely. I fill my hair dye bottle with 2 or 3 ounces of vinegar and wait until the tablet stops fizzing. If in doubt, shake it a bit. It shouldn't fizz any more. If it does, wait a couple more minutes.  While I was waiting on this. I mixed about 1/4 tsp of Wilton green dye in one of the bottles of vinegar. I used hot water from my tap to mix the paste (it needs a little heat to not clump). I filled the bottle to the 6 oz line (the top line on the bottle), capped it, gave it a good shake to mix the paste dye up and set it to the side. I used warm water to fill the rest of the the egg dye / vinegar solution bottles and capped them as well. You don't need to shake these as the dye tablet broke down in the vinegar.
Wilton paste dye in leaf green

Step 3: Prep the Dyeing Surface and Yarn

I like to lay down paper towels before my plastic wrap, but if your counter top or work surface is light in color or prone to stains, I would lay down some aluminum foil, then paper towels on top of the foil. On top of the paper towels, overlap some plastic wrap. This will act as a barrier to keep the moisture above the work surface and minimize clean-up.

Once you have completed this, pour the water out of your soaking yarn and squeeze (don't ring) the excess water out of the hanks individually. Once they have the major drips contained, place each hank evenly on the plastic wrapped surface.
Fig 3

Fig 3 is what your hanks should look like before you apply the dye. Kind of looks like angel hair pasta at this point. ;)

Step 4: Dye Your Yarn

This is the fun part, but it is also a lot of trial and error. I will warn you, so you won't be discouraged. Try to use colors that are close on the color wheel. Using contrasting colors (like orange and blue) will cause muddy browns. I am only using greens in this example. The first color is the Spring Green color from the small pack of the dye kit. The second is a bluish green from the large pack of the dye kit. The third color is the Wilton dye in Leaf Green.

Make sure your lids are on your bottles tight before you begin. I am going for a tonal color, which is like having really nice highlights in your hair. They are subtle and blend, but the color isn't flat or boring.

I started with a zigzag pattern in the lightest color, my spring green and did one pass. This is what it looked like:
Try to keep the dye even as you go. If you drip or goop, don't worry, it will be invisible at the end. 

Now pick up your second color, in this case, the bluish green and do the same thing. Do not try to hit the same area as your first pass, keep the color even and moving randomly.
Go all of the way to the edges of the yarn, if you go over the edge of the yarn and onto the plastic, lift the plastic a bit and the dye will just roll back into the yarn ;)

Now go for the third color doing the exact same thing.
Keep doing this until the yarn looks like this.
Flip the hanks over and with the wooden spoon and do the same thing. Smoosh the yarn with the spoon so that any pooling dye under the hanks is absorbed. You may have to refill your bottles for good coverage, but light spaces in the above picture will be fine because you will be placing the yarn in the final dye bath next.

Now that your hanks have been covered in the "highlights," I prepare a warm dye bath in the microwave safe container with vinegar, water and about 1/4 to 1/2 tsp of the Wilton dye. I chose the Wilton dye because it was the color I liked the best of the three. Mix the dye well. I added water to the picture above to bring it to the top of the container once the hanks were added and stirred it around a bit with the wooden spoon.
The highlights will not be noticeable until after the yarn has dried, so you should see a pretty consistent color. 

Step 5: Cook It

Microwave the container of yarn in the microwave for about 5 minutes, cover, and let sit 30 minutes. After 30 minutes, check your yarn. The yarn should have pulled the color out of the water and the water should be close to clear. If it isn't, microwave it another 3 and wait for 30 more minutes. Continue doing this until you don't see any (or minimal color, if no change after microwaving again) color in the water.

Let the yarn cool to warm on it's own then remove the yarn and fill the container with plain water and soak the yarn back in the water. No color should bleed at this time. If it does, you will need to heat the yarn longer until it does not bleed. You wouldn't want the color bleeding out on a garment or on you, so this is necessary.

Step 6: Dry Time!

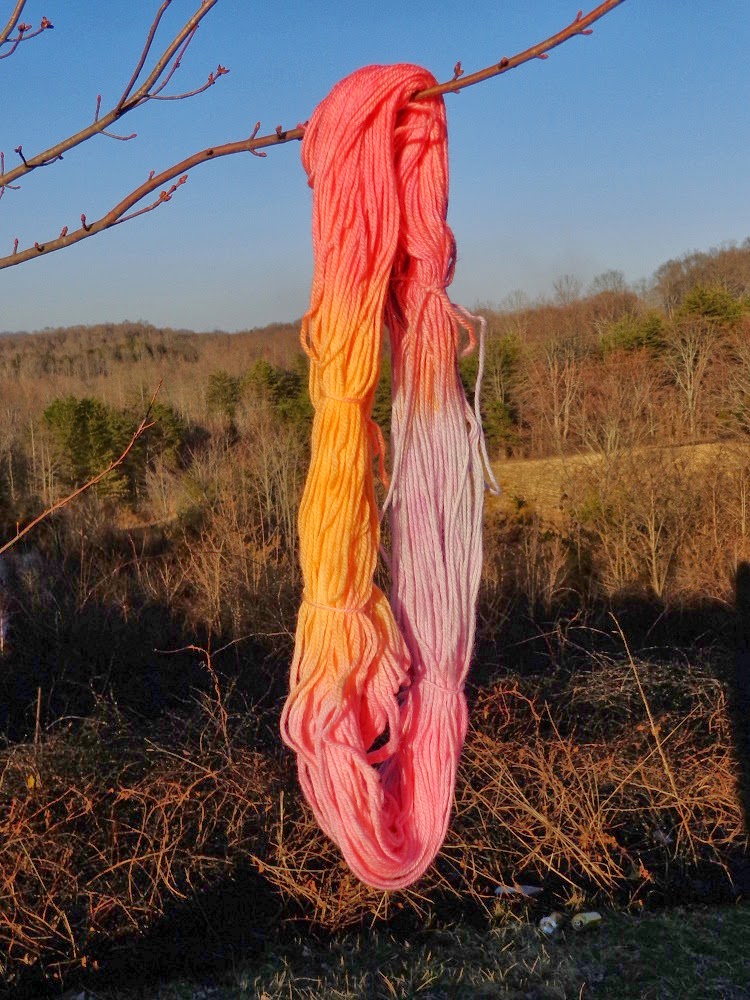
This is what the yarn looks like fresh out of the water with as much excess water drained from it as possible.
Right now you can't see a lot of the tonal variations because the yarn is still damp, and probably won't be completely dry for a couple days. I place the wet yarn on paper towels for about half an hour then hang each hank from a clothes hanger. I recommend a bathroom, kitchen, or other tiled / water resistant area for this since it can still drip. I hang mine from the chandelier in the dining room and leave the microwave container under it to catch drips. When the yarn is dry, I will post the finished product! Enjoy!


Wednesday, April 16, 2014

Summer!

Sorry for the gap between posts. The internet has been, and still is, acting up. :( Good news is, it gave me lots to think about for my next post! :D

I have been viewing the most recent trends that are going to be dominating the fashion scene for the Spring / Summer in order to knit and crochet (and write) some new patterns. The biggest trend I am seeing is color! I don't mean timid colors, either. Bright bold colors dominate. Think Rio Carnival color: canary yellow, cobalt blue, turquoise, flame red, carrot orange, and deep royal purple! I have never been afraid of color, but I realize a lot of people are, so the most wearable trend is combining neutrals (camel, tan, etc) or black and white with a pop of color.


Try a bright colored accessory or top with a black and white piece or a bright top with a black and white skirt, or even add a bright color to the hem of the skirt. When playing with color like this, remember a bold color will draw the eye, so if you like you legs, go with color on your skirt hem, if you like your face, bring the color to the top. Don't add color where you don't want attention! Otherwise, have fun with the trend and let your creative juices flow!

Friday, March 28, 2014

My Favorite Yarn Craft Websites!

Pinterest, Ravelry, Google, and Youtube!

When I first started crocheting 23 years ago (I was 8), there was no such thing as the internet as we know it today. Computers were expensive, huge, and the screens were either black and white or black and green! There were no pictures, and forget videos. Just writing this makes me feel old! I learned how to crochet by playing with my grandmother's crochet hooks, buying $1 skeins of yarn at Walmart, and reading library books. 

A few years ago, when I endeavored to learn to knit from patterns I was in awe of all of the technology available on the subject. I could look up easy, beginner patterns on Ravelry or Pinterest, then I would Google the abbreviations in the pattern if they weren't explained. Once I knew which stitch I was looking for, I would then look up a tutorial on Youtube! I love the options we have today! 

Each of the above mentioned websites have their own perks:

1. Pinterest - www.pinterest.com


This is by far one of my favorite websites for inspiration! Pinterest is a website where people "Pin" pages and websites in which they located something that piques their interest onto "Boards" for future reference and to share with others who have a common interest. It is a virtual Pin Board! To find almost anything, just type the search term or keyword in the lovely search box at the top center of your screen. Below is a screen shot from a search for "knitting." If you want too view the website the pin came from just click on it, wait for the page to load, and then click on it again and you will be taken to the website where you can find out more about the pin. :D


As you can see, you will get a variety of images. If you want to look at boards of knitting that a single person has pinned, you can click on the "Boards" button. You can also search for a specific Pinner if you like.

2. Ravelry - www.ravelry.com
This is by far my favorite website for locating patterns. Members can contribute their patterns as well for free or to sell. You can search for patterns and narrow your results by your craft (crochet, knitting, machine knitting, and loom knitting), whether the pattern is online or in print, whether the pattern is free or for purchase...you get the point. I love to search for ideas for a single ball of yarn in a certain yardage. Also, if you purchase a ball of yarn, you can add it to your stash or search for the yarn under the yarn button and get ideas on what other people are making with it.


The above screenshot was a simple search of knitting patterns and they are sorted by what is "hot right now." People contribute every day so this seems to change on a daily basis.
3. Google - www.google.com

Who doesn't love Google? I think all of you have seen what Google can do, but if you get stuck on a term (or anything really), this website will give you the answer. Simple, straight to the point, and beautiful!

4. Youtube - www.youtube.com

Youtube became my best friend when I was learning to knit. It is hard to learn some methods without visually seeing the hook or needles in action. If I want to learn a new stitch, all I have to do is search the stitch and it pops up! In the screenshot below, I searched for "knit stitch" and it came up with knitting for beginners and the actual knit stitch.


The cool thing about this is when you see a pattern that you want to try that is beyond your current skill level, you can look up and practice the actual stitches prior to starting the pattern. I have yet to come across a knitting or crochet stitch that was not on Youtube, and therefore, could expand my knitting skills by watching and practicing :D

Saturday, March 22, 2014

Inspiration

This gorgeous yarn on the left is one of my most recent experiments. It is all non-toxic with the dye coming from a PAAS Easter Egg kit! Yes, easter egg dye made this gorgeous skein of yarn. I have used Kool-Aid and Wilton icing paste dyes with amazing success, so when I saw some experiments using PAAS dye, I stocked up on it as soon as it hit the shelves. :D


I was inspired by the lovely sunset seen to the right. ("http://www.pinterest.com/pin/85568461644631480/")The colors change from a periwinkle to pink, orange, and reddish pink. The most difficult part of the dyeing process for me was finding out what color each one of those little tablets were. They look nothing like what they turn into when mixed with vinegar and water. For instance, the lavender was completely blue. One of the yellowish tablets actually turned green. I decided to pull out some condiment cups that I use to carry salad dressing, etc. in my lunch  box. I dissolved one tablet in each cup in 2 Tbs vinegar to determine it's true color and stored the colors in the little condiment cups until I used them.

Yarn dyeing is not an exact science, but it sure is fun to play with.